Saturday 30 September 2023

Solar power without direct sun

The three solar panels on this van point in three different directions: left, front, right. The fourth direction could not be harvested - in the back there is only the metal roller shutter, no option to affix a panel there. 

And the total capacity of the solar controller is max 80 V. With the three panels I usually get during idle a total voltage of 65V. This means I cannot even connect a fourth panel in series there.

Today I parked the van in such a way that the sun only came directly from the back. Means no direct sunlight on any of the panels.

And surprisingly, there is a power still generated, as the display shows:


12.5W and 0.35A are being sent to the controller, and from there into the battery. This is quite amazing and surprising.

Friday 29 September 2023

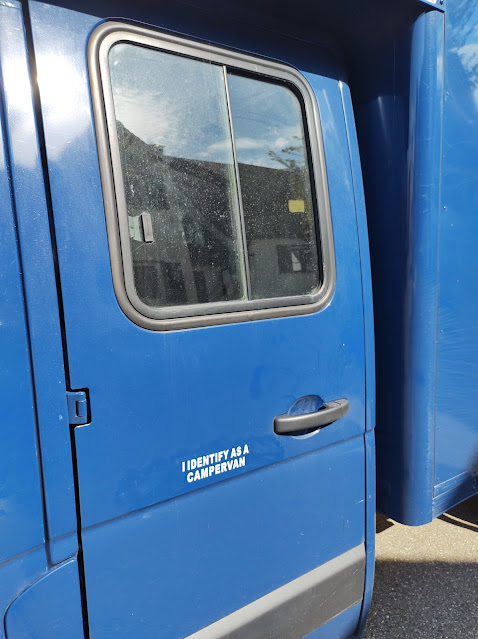
Nice sticker


When I saw this sticker on Amazon, I could not resist and bought it. Now it is already on the van.


Thursday 28 September 2023

Still high temperature inside living quarter

Quite hot in the bedroom ...

Just a little sunshine, and the Luton gets hot like a baking oven. It is really important that I soon complete the whole wall installation.

Windows arrived, 6 pieces, tinted gray. So the next step will be cutting the windows into the Luton box, then affix the acrylic glass plates. Then add the Styrofoam, the plastic foil, and the wall panels.

And then I am curious how it keeps the heat out. The roof will not be insulated - this may still be a source of heating up. I will have to see if a blackout curtain for the roof may be needed.

Wednesday 27 September 2023

More things for the bedroom

Found a nice large thermometer/hygrometer. And also a radio clock. The latter one is for bathrooms. I may cut a circular hole into the wall, so that it looks more flat.

Thermometer, hygrometer, and clock at the left bedroom wall.


The Urinal is in place

There will be a composting toilet. But those require to separate #1 and #2. So even for peeing one needs to sit down. Unacceptable for any self-respecting man. Therefore, my camper will be one of the few ones (the only one?) with a urinal.

And now it is mounted with a 12l container. Will try this soon. There is a smell barrier. If that does not work, I will install a syphon. But for that I need water flushing. The current urinal does not need water, remains dry. 

It will be in the bathroom, which I will hopefully be able to seal completely so that smells remain there and are sucked out with a vent. I hope to keep the rest of the camper smell-free.


Container for 12 liters. I cut a hole in the lid, then filled the gaps with black Sikaflex.


Temporary mounting of the Urinal. Will be tested in a few days.


Tuesday 26 September 2023

Trying to fix window leaking

The two bullseye windows did show significant leakage during the rain storms last week. The reason was that I had mounted the rubber seal so that a gab was at the bottom. I did hole water could flow out from there, but instead it did flow into the room from this gap.

The left window was easily being fixed: it had not been glued, so I could simply press it out, reposition the rubber seal so that the gap was now at the top, then press the window dome again into the hole. 

The right window was more difficult: I had glued it with white sealant glue, and the window was firmly stuck to the rubber seal. If I had tried to remove it, I would have broken either the window or the seal. So I kept the window and the rubber in place. But I did try to fill all the gaps with black Sikaflex. Made a big mess, but hopefully this will be tight. The next rain will show.


Will later clean the over-spilled Sikaflex glue.

Then I had another idea: I mounted lightweight wall panel plastic sheets under the windows at the inside, which would deflect incoming water to the bottom. At the bottom there is a kind of trench where water would accumulate. I drilled a few holes in the bottom of that trench, and so now I have a water drainage concept.

Let's see if that works in a real rainy situation. It will compromise the full Styrofoam insulation - can here only use the thinner Styrofoam, maybe some wool. But I do not want to capture the incoming water with wool or other things, but I want to let it flow out without any obstacle.

Partial drainage wall at left window.


Partial mounting of the drainage wall at the right window.


Sunday 24 September 2023

Voltmeters defective

One of the volt/ampmeters seems to be defective: it is connected to the output of the solar controller, shows correctly the voltage, but does not show any current - even though the current is flowing to power the compressor fridge. Should be about 5A. But the meter only shows 0.01A.

So I got a replacement.

Then another voltmeter broke: the display of the main solar voltmeter suddenly did only show garbage. No numbers, but just a few segments were showing.

Will also need to replace it. Cheap junk...

Had a similar problem with other volt/amp meters for my home solar installation (Balkonkraftwerk).


Display on the solar controller shows: 57.2V input from solar, producing 12.9V output to consumer circuit.


Temporary control view board: top voltmeter shows power from solar panels, producing 1.8A at 116W. Center voltmeter shows 13.65V sent to consumer circuit, but 0.01A - cannot be, because fridge uses 5A when compressor is running. Bottom voltmeter shows battery management: can show positive (battery provides power) and negative (battery is being charged) current. Here 7.49A flow into the battery, at 13.6V, resulting in 102W battery charging.
The panel on the right is the 12V circuit breaker panel. Tom switch is on for the fridge. Other switches will be used in the future for other specific 12V devices (heater, lights, water pumps etc.).


Solar power display.

Consumer circuit display.

Battery management display.

Panel is temporary attached with bungee cord. Will be done more professional in the future.

Battery provides power: 22.7W at 1.81 A going out from the battery. 
Defective amp meter, only showing correct voltage, but not showing any current, despite current being used.

Another shot of the power meter directly at solar panels, at other time. 


Sunday 17 September 2023

Getting ready for staying in the camper

During the next few days I will have not much opportunity to work on the camper. Next weekend I will actually use it, so I had to prepare everything and bring the camper from the construction-development mode into the camping-mode.

So after some cleaning and removing all the construction items, the Luton camper box now looks like this:


Preparing the first real and final wall segment inside the van

I wanted to progress at least one short section of the walls, to see if all is feasible what I had planned. Since soon I would want to use the camper again, I would need the bedroom. The windows are in, the solar panels attached, so there is nothing anymore which prevents me to try completing a whole brief section to its final specification.

I had bought Styrofoam in 2 thicknesses: 3cm and 1cm, plus a sack of mineral wool (Knauf product). I also had gotten high-temperature glue for attaching things to the walls, which could get very hot (50 deg C). 

First I removed completely the already rotten boards at the bottom and cleaned the groove as good as I could.

Bedroom, left side.

Bedroom, right side.


My friend and neighbor Bernd Grube has offered me to use his Styrofoam cutter. It cuts through Styrofoam with a hot wire and creates an excellent straight cut.


The first piece of 3cm-thick Styrofoam was then glued onto the first wall segment.


The gaps were filled with the mineral wool.

A second segment was done the same way. All the gaps were filled with the mineral wool, so that there would be no cavity where any air could heat up from the hot metal, when the vehicle stands in the sun.


In top of that Styrofoam, another 1cm cover of Styrofoam was added, to cover also the metal beams which segmented the wall.


And voila, the wall is completely isolated. Near the roof I also had to glue Styrofoam pieces to cover the metal. I also added two boards at the top and at the bottom, to provide a way of attaching the final wall cover and other things.


Before the wall cover could be added, the moisture trap foil needed to be glued. I had some relatively thick plastic foil left over from some packaging, and so I recycled this foil as my moisture trap. The purpose of this is to keep all humidity inside the van and away from the walls. When those walls are cold in winter, the humidity would condense when it hits the walls, and then water droplets would appear. Everyone knows this effect, when sitting in a car in winter without having motor or heating on: the windows fog up very quickly. 


And then finally my first pieces of the GrossFillex wall panels (from Globus Baumarkt) could be attached.


I decided not to glue them onto the wall, because in case I ever would need to remove them, that would destroy the plastic foil and properly also the panels. So I affixed them with thin nails, which easily can be removed if necessary.

The first two panels are in place.


Three panel segments are in place.

Now one can much better imagine who the bedroom will look in the future.

I added the matrasses and bedding again, as it had been before.


I also could not resist to place that little art work photograph to the only wall where it would fit. Is not yet attached, just leans against the not yet finished wall on the right side of the vehicle.


That little yellow lamp has its own history: I had it since the early 1970s in my bedroom. There were two of these, but this is the one that survived. Still works, now with LED bulb.


.


Saturday 16 September 2023

Affixing the third solar panel, and installing the 12V electrics

This Saturday a major step was achieved: I added the 3rd solar panel, revised the wiring, and hooked them all up together.

First I taped the panel temporarily with a stripe of black tape, to keep it in place.


Using grommets for the cable meant that I had to cut off the MC4 connectors which were attached to the panel: they were too big for a simple cable hole, and I did not want to create a larger hole for them.


Both cables now are fed inside the Luton box.


Because of the step in the box surface I had to attach a piece of wood, to keep the panel in a straight plain. 

Done. The front solar panel is now connected. Like the other two panels, it is kept by 4 self-taping screws and a large disk. No glue was used; I did not want to spoil the Luton box surface, just in case I would later decide to remove the panels. The two side panels have an additional tape, to prevent wind during driving to go under the panel and lift them off. 


Solar panel on the passenger side.


Solar panel on the driver side. Still with the wire conduit through the bottom of the box.

Driver side solar panel, now with proper grommets as cable conduits. 

Unfortunately I only had grommets for a wall thickness of about 1 mm. But the wall of my Luton box is much thicker: there is an outer metal sheet with approx 2 mm thickness, and then there is another inner metal sheet with approx. 1 mm thickness. This reveals an interesting observation: It appears that at first the builders of this box did construct it from a thin 1mm aluminium sheet. It apparently was decided that this is not sufficient. Maybe it kept bending, making lots of noise. It must have been completed, as that layer is also painted in blue. If that was not used for the outside view, then why would it have to be painted? Therefore I think that this inner thin layer was the first attempt to have this box constructed, and it turned out to be too thin.
Then the outer layer appeared to have been mounted, with a thicker 2mm sheet metal. Affixed on many places to the lower layer with rivets.

And my grommets now cannot cope with this 3mm thick wall... when I push them through, some of them broke off. Here are a few pictures from the inside:  


Later I added some SikaFlex from the inside, to make the opening tight. From the outside, the grommets seem to be undamaged.

I used my thick wires for my home solar installation setup to guide all the solar power to one terminal. This allows me at this central location to modify the connection of how these panels are configured. I opted for putting them all in series.


The first terminal connector set was too small for some of the very thick cables, so I had to replace it with a larger one for 16 sq mm cable conductor cross section.


The technical data of the solar panels:


Interestingly, each of the 3 panels produced an idle voltage of 21.5 V or more, even though only one of them was facing directly the sun, whereas the others were pointing to other directions.
Adding them up leads to a voltage of 66.8V:


When the battery was connected through the controller, the voltage dropped to 29.7 V:

This picture shows how power is produced by the panels: a total voltage in sum of about 30 V creates a current of 1A, producing about 30W of electric power.


Interestingly, this power then could increase even when the battery was connected. This is because once the battery has a consumer attached, its voltage goes down, and then the controller puts its voltage up to re-charge the battery. That is when the controller uses more power from the solar panels. 

So even though my panels are mounted in 3 different directions of the sky, they still produce a total of over 60 V and almost 1V current, resulting in more than 60 W. Some time later this even went up to 70 W.


The voltage at the battery then was 14V.
Current is unfortunately currently not measurable, because of a faulty measurement device. Here it shows 0 A, which is nonsense because the battery is actually being charged. I have already ordered a new measurement unit.


I also am now able to produce 230V from the battery with an inverter. This allows me to feed the 230V directly into all my regular power circuits, also using the existing safety infrastructure like fuses etc. 


And now I can run a 12V compressor refrigerator for 24 hours. So I will always have cool drinks in the camper. A very important step!


The temperature in the 2 refrigerator compartments is 7deg and 3 deg. 

Here is the expanded electricity setup, now in addition to the 230 V circuitry the 12V circuits were added. This is all mounted on one single board, which can easily be removed and attached somewhere else. I will eventually re-do this board, with a tighter mounting. There will be a cover door, showing only all the displays and meters.